As an Amazon Associate I earn from qualifying purchases.
Among OBS’s impressive capabilities lies one the best time-saving tools, recording hotkeys. Gone are the days of fumbling with your mouse to click on the record button and missing that perfect moment or the annoyance of alt-tabbing out of your game to restart your recording.
With OBS recording hotkeys, you can initiate and stop recording with a simple key press, revolutionizing your workflow and boosting your efficiency. In the guide below, we’ll show you exactly how to start recording in OBS Studio using a hotkey!
Setting up Start Recording Hotkey Setup in OBS
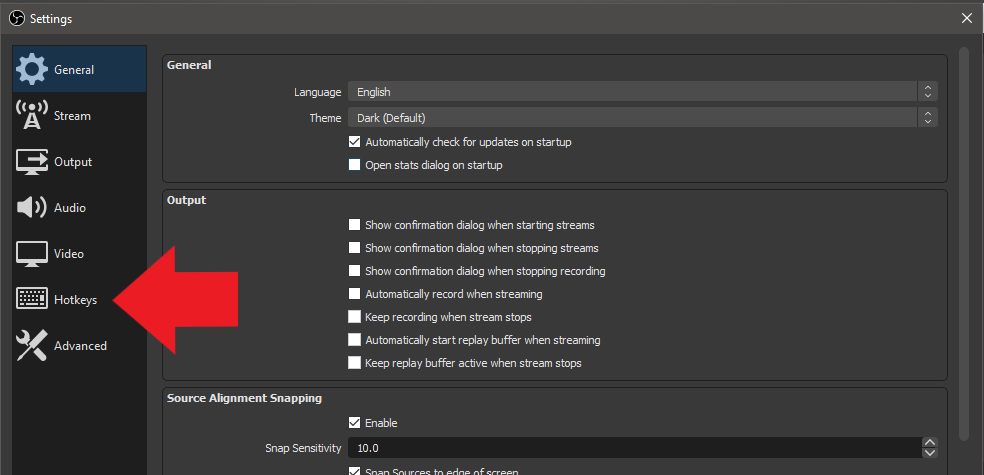
First, lets open up our OBS Settings Menu. Click Settings.
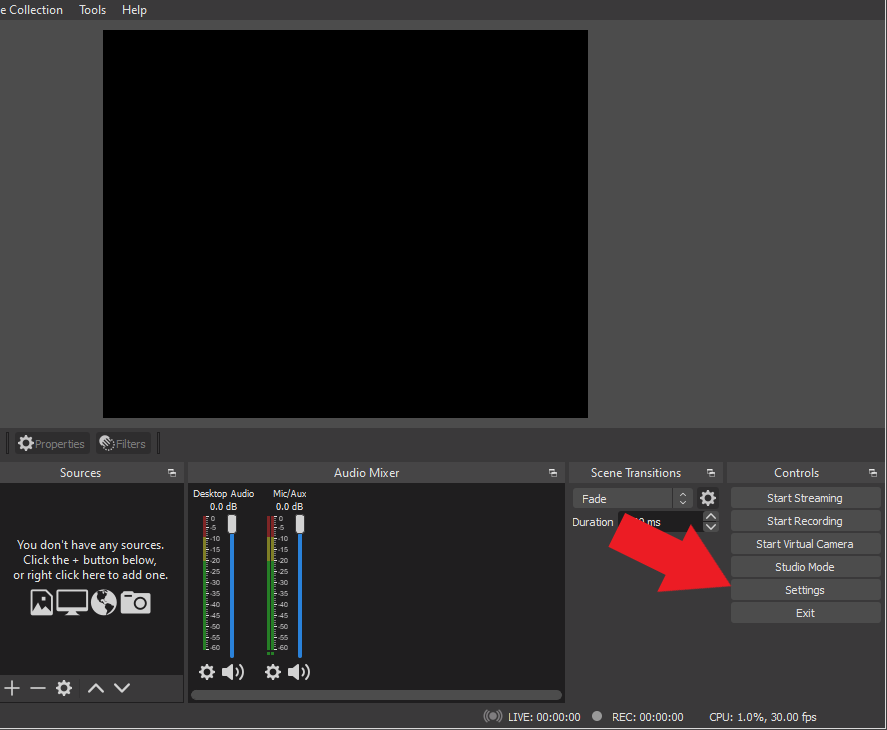
On the left side panel, click on OBS Hotkeys tab.
Find the hotkey options that says Start Recording and Stop Recording. There are no default hotkeys setup.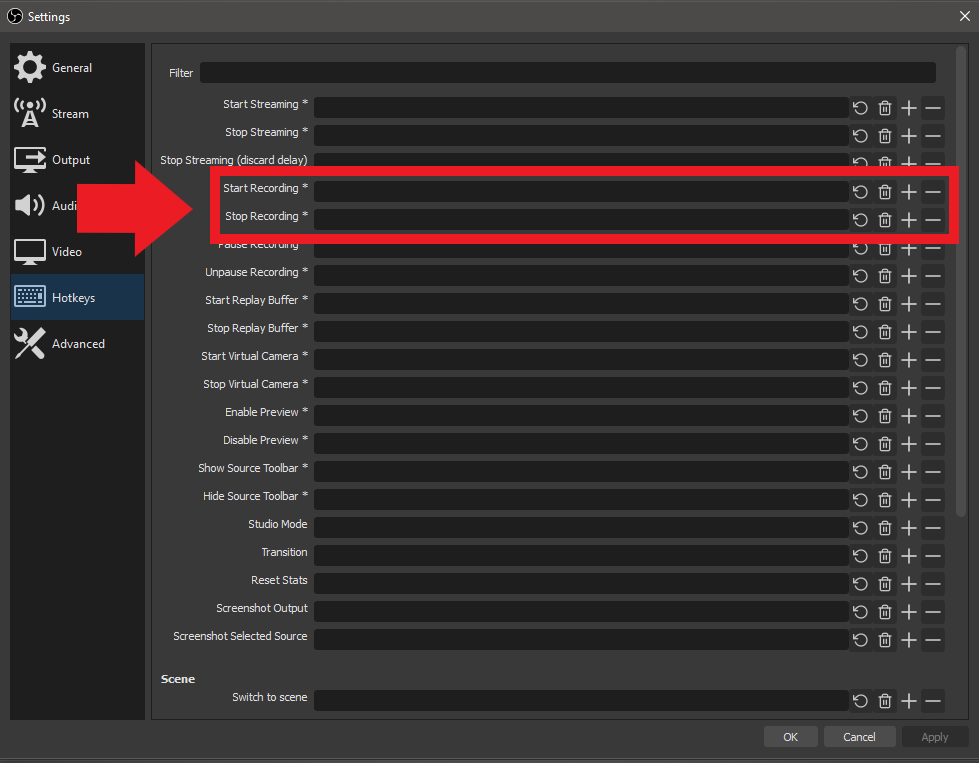
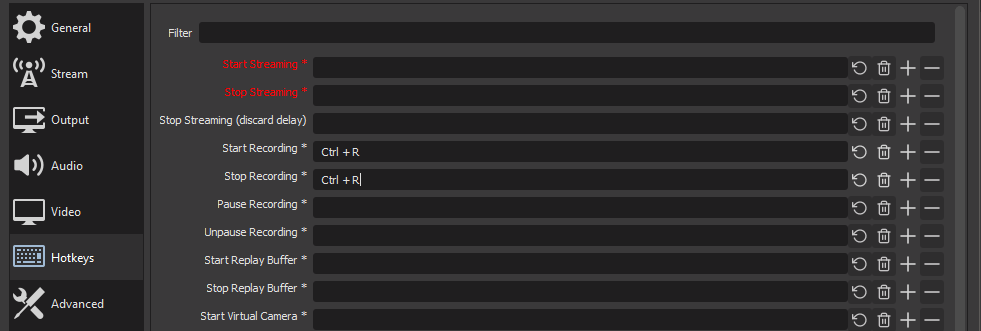
Next, enter the hotkey combinations you want to use to enable and disable screen recording. We entered the custom hotkeys, CRTL + R.
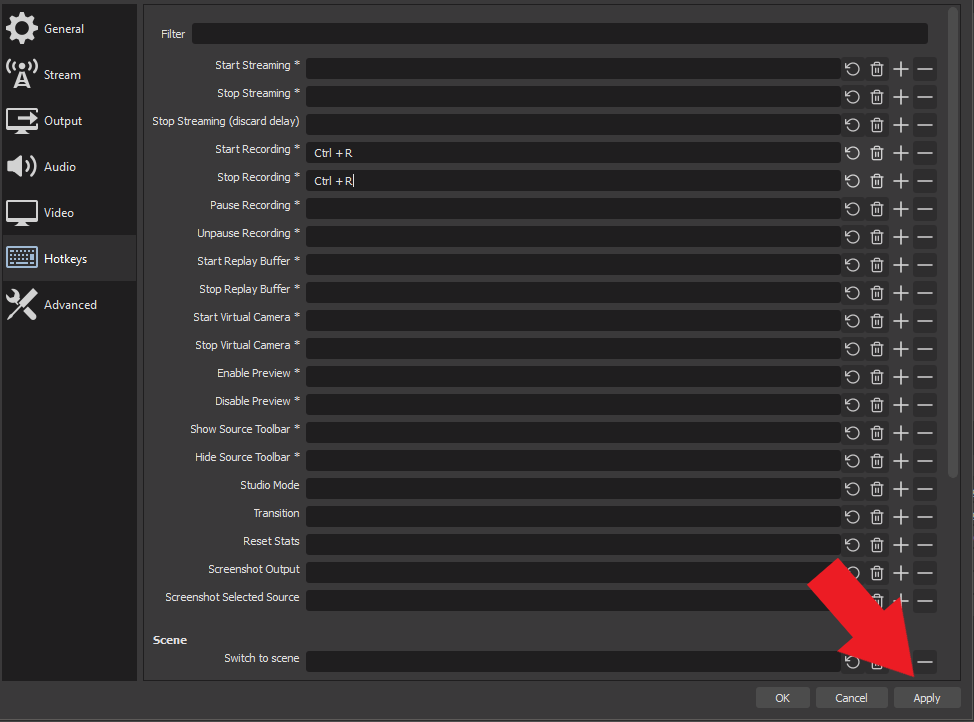
Click Apply and you are done!
Now you’ve successfully setup both a start and stop recording hotkey with OBS.
Setting up OBS to Automatically Record
For the forgetful types like myself, clicking the Start Recording button can be an additional step that is easily looked over when going live. Thankfully, OBS has another really cool function built in that begins recording mode as soon as you start your stream. This will save you a lot of time during lengthy recording sessions and better optimize your workflow!
Click on the settings button in the bottom right corner of the OBS.
Under the General tab, find the Output settings section. Check the box that says Automatically Record When Streaming.
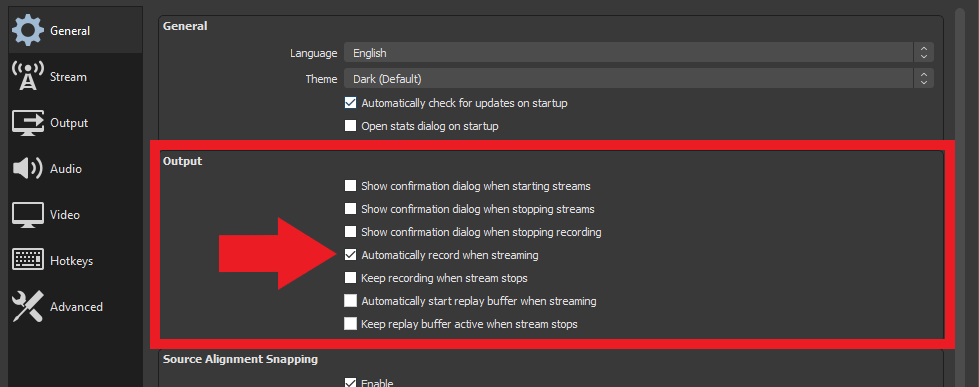
Now Click apply and when OBS starts streaming it will start recording at the same time. Please bare in mind the file size of your recordings. Getting an error notification mid stream that your hard drive is full is never fun.
OBS Recording Settings
Now that you have your keyboard shortcuts setup, lets go over some basic recording settings to make sure the quality of your recording is top notch. We would suggest using the OBS auto-configuration wizard, as its going to give you a realistic quality target since its scanning the hardware of your stream PC. But if the auto-configuration wizard didn’t meet your expectations, we have a very basic overview of our settings that you can use as reference.
IMPORTANT: Just noting, our settings aren’t viable for everyone since hardware varies from PC to PC.
Video Settings
Lets open up OBS again, go to Settings. Click on the Video tab.
We’re going to shoot for 1080P video and frame rate of 60FPS, no downscale filter required since both the base resolution and canvas resolution match.

Next click on the Output settings tab and change the Output mode from Simple to Advanced.

Recording Settings
Under the recording settings, you’ll have a few options to review.

- Recording Path – This is where you will store your recorded videos. We would suggest placing them on a hard drive other than you boot drive (C:), as you may see some impacts to the quality of the recordings.
- Recording Format – OBS developers suggest ALWAYS recording in either: Flash Video (FLV file type) or Matroska (MKV file type). So in the event that your PC or OBS crashes, OBS will record up until the point of the crash and preserve the file. Recording straight to MP4 is not recommended.
- Video Encoder-There are two main video encoders to choose from, but entirely depend on the hardware of your PC:
- x264 – This option encodes video using your computers CPU. If gaming and streaming on 1 PC, we would only suggest this if you have either a 6 or 8+ core processor.
- NVENC (Recommended) – The more commonly used option of the two, NVENC uses your graphics hard to encode video. It can turn out high quality recordings with minimal impact to your GPU usage. Recommended if you have a 2000 series NVIDIA GPU or higher.
- Audio Encoder – The encoder for your audio, would leave this to the defaulted option FFmpeg AAC.
- Audio Track – Choose how many tracks you want to be recorded, you assign audio tracks in audio mixer in OBS Studio.
- Rescale Output – Since our base and output resolution are the same, no rescaling is needed.
- Custom Muxer Settings – This is more of an advanced feature, you can leave this blank.
- Automatic File Splitting – Select this box if you want to customize how your audio files are split.
Encoder Settings

- Rate Control – Set to CBR, this ensures your upload bitrate stays stable and consistent.
- Video Bitrate – For YouTube videos, YouTube’s recommended bitrate for 1080p60fps is 12,000kbps (12Mbps).
- Keyframe Interval – Leave this at 0.
- Preset – P6: Slower (This is the highest quality preset that will yield the best results)
- Tuning – High Quality
- Multipass Mode – Single pass (Selecting quarter or full resolution will only put additional strain on GPU, for little to no quality gain)
- Profile – YouTube Recommends setting to High.
- Look Ahead – Leave unchecked
- Psycho Visual Tuning – Depends on the type of game you are streaming. Meant to improve quality for high motion games, at the cost of additional GPU load.
- GPU – Leave at 0. Allows you to select the GPU you want to encode with, unless you are using SLI go ahead and leave at 0
- Max B-Frames – Leave this set at 2. Turning up B frames to 4 might improve stream quality for low motion games. But overall B frames assist video compression over lower bitrates.
Audio Settings
Last settings we need to setup are the audio settings in OBS.
Go to the Audio tab, assign the Desktop Audio as Default. Next under Mic/Auxiliary Audio, select your mic or input device.

Now that you’ve got your recording hotkey setup along with the best audio/video settings for your PC, your set to start your OBS recordings in the most efficient way possible. We would suggest trying a couple of test recordings to ensure everything is prepped for your next recording session.
Conclusion
Congratulations! You’ve now learned the art of setting up a recording hotkey in OBS, and you’re well on your way to becoming a content creation wizard. With this newfound knowledge, capturing those special moments and creating flawless videos will be smoother and more efficient than ever before.
Amazon and the Amazon logo are trademarks of Amazon.com, Inc, or its affiliates.